
The high level steps are laid out in the VMware guide which can be found here.
The main things I wanted to achieve in the upgrade/migration was to test the process, keep the same Names and IP’s and have the bonus of getting rid of another windows based system.
Prerequisites
- Check all your compatibility, vCenter to SRM version, SRA array support (check with the array vendor guides as VMware compatibility has a tendency to be out)
- Upgrade your Windows based SRM install to 8.2.
- Stop the Site Recovery Manager Server on your Windows Host machine
- note just stopping the SRM Server service is fine
- Rename your SRM virtual server name to SERVERNAME_OLD (note this is not the windows OS name just the VM instance name)
- you can do this after the migration is complete if you deploy the new appliance with a diff name
- Deploy the SRM appliances to each site using the same name and IP of your existing windows SRM hosts. DO NOT POWER IT ON YET.
- Make sure you have the SSO Admin name and password and the DB password for SRM DB, if you dont have either of these you will get stuck at some point.
- Download the SRA for your storage array if using Array Replication..if not don’t worry.
Migration
- Log into your windows SRM host machines
- Open an ADMIN Command Prompt and navigate to your %SRM_INSTALL_DIR%\bin
- Run the following script on both your SRM servers,
- export-srm-data.bat <export_dir>
- You will be prompted for the DB password, enter it
- Copy this exported data onto your local machine
- make sure you know which export is for which SRM server
- Power down or disconnect the NIC on your Windows SRM host servers
- Power on your new SRM appliances
- Connect to the SRM appliances with SSH
- you may need to enable this through the appliance admin page if you did not tick the box during ovf deployment.
- Using your preferred program, WINSCP, transfer the appropriate Exported data to the appliance
- run the following script /opt/vmware/srm/bin/import-srm-data.sh <export_dir>
- you will be prompted for the SSO admin username and password
- you will be prompted for the root/admin password, this is the password you set during OVF deployment
- if you set a credential on the exported data you will need to enter that also
- you may receive a request for your SRA credentials, even if provided this should fail as you have not installed the SRA into the appliance.
- Log into the Appliance web interface and check the Time configuration and set your correct time zone if needed.
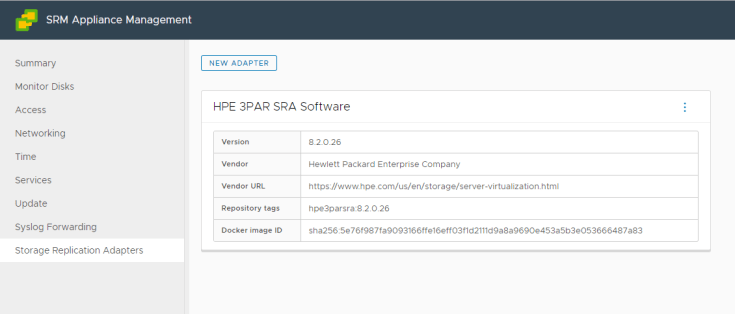
- SRA Import, this is optional but required in my instance
- Login into the appliance admin interface
- select Storage Replication Adapters on the left
- click new adapter, select the location of your SRA from your storage vendor, be careful here that you have the right file it may be that the storage vendor has buried the file within a ZIP and then within a TAR .
- It should upload and install, the SRA will show in the interface as below.
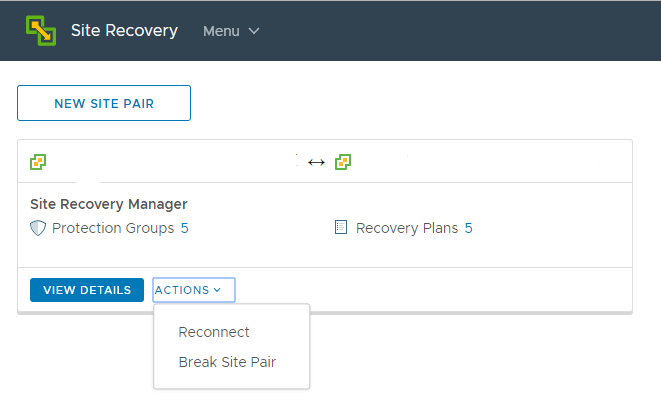
- Log into vSphere client and goto the SRM home page
- The site pair should show in error state
- Select actions reconnect and follow the bouncing ball.
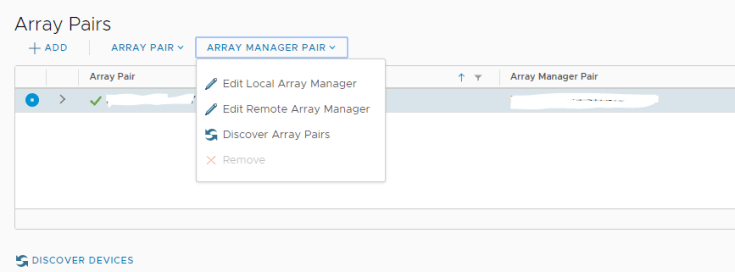
- Once complete open the site pair and re-scan for your SRA’s (for storage replication)

- Then Edit your local/remote array manager and enter the username and password.
- Highly recommend to log back into the appliance admin web page and disable SSH login.
You should now be fully working. Highly recommend that you run a test fail-over to ensure functionality, it is your DR after all.

Leave a comment